First Time Making Chainmail
Introduction
Recently my fiance and I decided we want to make our wedding renaissance fair themed. We’re both into RPGs and fantasy settings but neither of us has much background in LARP or costumes. I was artistic as a kid but I just haven’t done much in the way of art as an adult and I thought our desired wedding theme was an opportunity to change that. So I decided I’d take the nearly two years between now and our planned wedding date to start working on real-life crafting skills.
My first endeavor into this is creating chainmail. I had seen some people do it years ago and it didn’t look that hard. So I figured chainmail is probably a good place to start. I looked online, found some guides, did some reading, and this is how my first experience went.
Making the Rings
Making the rings starts with selecting a wire and a dowel. For armor, it was recommended to start with a 16 gauge stainless steel wire on a 5/8inch dowel. However, I decided not to make armor for my first piece. Both because I was eager to start and the local hardware store was out of stainless steel wire, and because jewelry pieces are smaller allowing me to accomplish something quickly and get a greater sense of accomplishment. So we got two smaller dowels and went to the local craft store to get a prettier wire type. We ended up selecting 16 gauge copper wire
for my first piece and putting it on what I think was a 1/4 or perhaps 1/3 inch dowel. For my second project, I actually went with a smaller wire for reasons I’ll elaborate on in this post. In selecting the wire remember that the higher the number in the gauge, the smaller the wire actually is.
Coiling the Rings
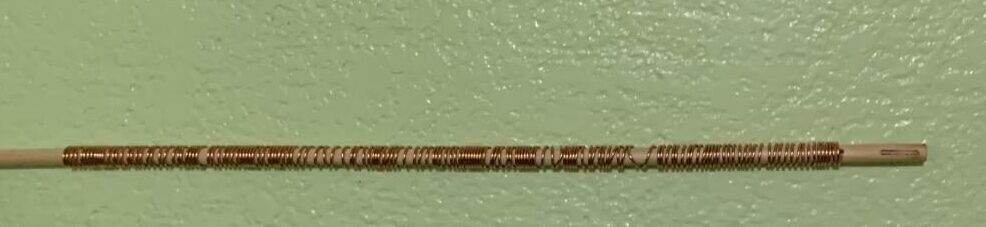
I started the process of actually making the rings by drilling small holes in the dowels with a cordless drill. Once that was finished I put the end of the wire through the hole and started wrapping it by hand. Bending it around the dowel to create circles. This was a bit slow so based on some recommendations I found while searching online I ended up inserting the dowel into the drill, clamping down on it, and using the drill to spin the dowel as I worked. This ended in less tightly wrapped wire but sped the process up greatly. I’d recommend doing it if you feel comfortable and have the hardware but using your hands is also an effective method that can actually yield some nicer coils if you take your time with it.
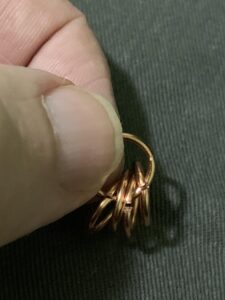
Cutting the Rings
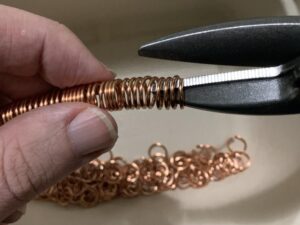
Once I had the coils made I forgot to remove it from the rod and cutting the coils was proving to be a real challenge. However, once I remembered I cut the bit going through the dowel and started cutting the coil with wire cutters as pictured above. Getting it off the rod was a bit of a challenge as tightly wound as it was at parts but once it was the process was fast and simple. With wire cutters, you’ll need something rated for the gauge of wire you want to cut. I tried with smaller wire cutters and they simply didn’t work. Also as you can see I used wire cutters with a fairly thin tip. Some models with larger tips won’t fit inside the rings.
Finishing the Rings
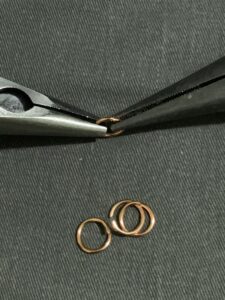
Once the rings were cut making an actual ring out of it was a matter of bending the two ends to form a complete circle. This proved rather difficult because of the small dowel size and the large gauge of the wire. Bending them precisely together without damaging the ring proved challenging at times. Another challenge was that the pliers pictured are normal pliers with small teeth. These had a tendency to rough up the wire as I was working with it. For my second project, I did jewelry pliers that were smooth on the inside. This allowed me to be a bit more forceful without damaging the piece I was working on.
One major thing to note at this step is completing all the rings for your project at this step is a bad idea. You’ll need to leave some open rings to weave them together.
Weaving the Mail
Since I am hoping to eventually make armor I started with the basic weave for European chainmail known as the “four in one”. This is because on larger pieces of it each link is connected to four others. To start with you take one open link and hook four completed rings into it as shown above.
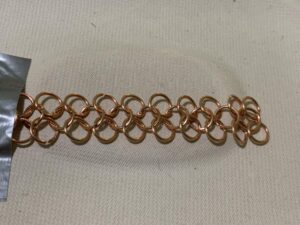
Once you have your first piece finished you lay it down as flat as you can. Once it’s flat you should have one ring with four around it. The center link will go over 2 of the links and under two of the links. At that stage take another open link and hook two finished rings to it. Feed the open ring into two of the outer rings in the pattern.
How you do this is very important to success. Look at how the center ring attaches to the two rings you aren’t connecting the new ring to. For instance, it may go down into one and up into the other as the center rings do in this picture so that the center ring rests underneath the outer rings. To make a solid quality chain you need to feed new links on in the same manner so all the center rings to rest on the outer rings in the same manner. Once you have this down you continue making segments of one open link with two closed ones hanging on it. Feed the open kink through the two fresh outer links each time you add a segment. I’ll make a video to demonstrate this later.
This seems really simple but the links can move around a lot during this process making it really hard to keep track of the pattern. That is why one end is duct-taped in this picture. By duct-taping one and pulling it taut I was able to see the pattern a lot more clearly.
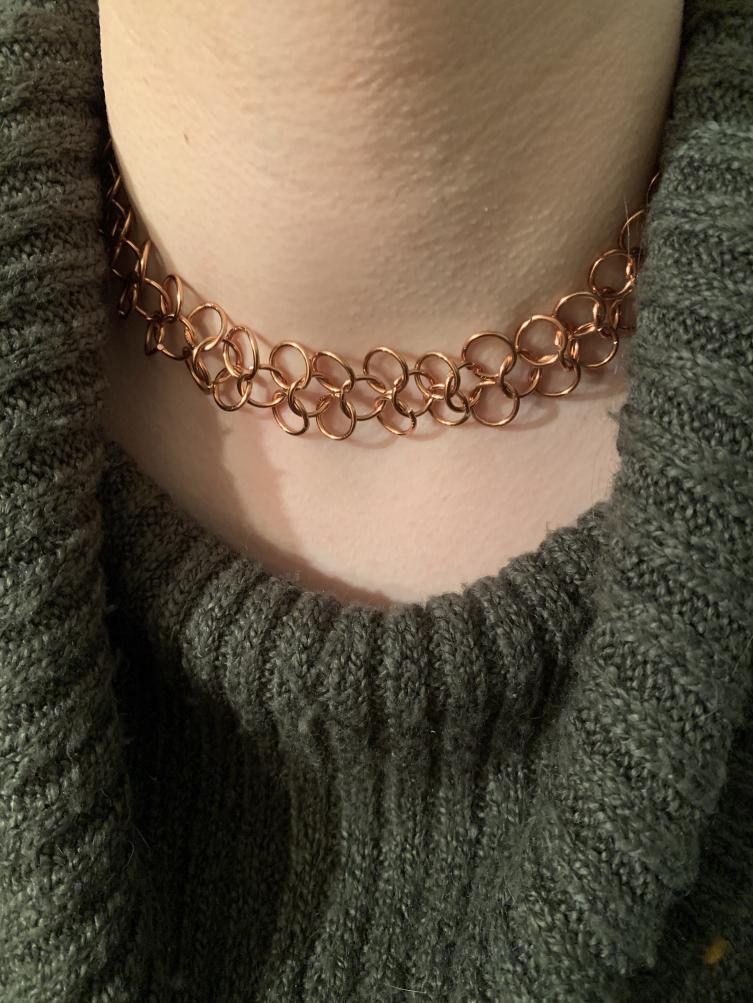
The Finished Product
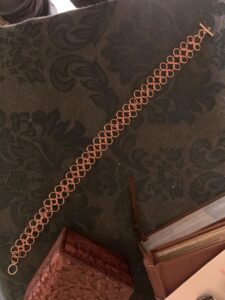

As you can see even this simple armor weave ended up making a rather elegant looking necklace. Plus the chainmail design leaves room for a creative jeweler to add to it with beadwork or other decorative measures.
There are a few problems with this piece though. Some poorly closed rings and rough patches made by the toothed pliers make it slightly irritating on the neck. The poorly closed rings can also cause some to slip free.
My Takeaways
My first take away was to get smooth jewelry pliers. I did this in my second follow-up project and that worked out a lot better.
My second takeaway is to consider doing two colors to start with. This creates a clear distinction between center rings and outer rings making it a bit easier to work with.
My third takeaway is to consider a thinner gauge and larger dowel size. This makes bending and closing a bit easier. However thinner gauges also slip through each other more easily if the close isn’t precise as I learned in my second project so don’t go too thin to start with.
My fourth takeaway is to find a way to hold the rings steady as you work with them. The duct tape helped a lot with this project and I’ll be trying a corkboard and sewing pin system for my next post. The piece moving around as I tried to work with it was my number one challenge.
My fifth takeaway is I made the right choice starting with jewelry. I made this entire piece in a few hours on the same day. It was satisfying to finish it even if it wasn’t the perfect piece. And now I can work out the imperfections on other smaller pieces before I take on some huge ambitious piece only to figure out I’m doing it all wrong partway though.
Shopping List to Start on Your Own Chainmail
This shopping list contains affiliate links. Using these links will support our site and help me to devote more time to put out new content but there are other viable options to get all these items. I appreciate it if you do support us through using our affiliate links but understand if you don’t.
1. Jewelry Pliers x 2
The linked version is smooth with no teeth. Make sure whatever you get is similar as the teeth can do damage to your project.
2. Wire Cutters
These are what I used. Strong enough to cut a 16 gauge wire with a thin enough tip to cut several links at once.
3. A Dowel
Shipping costs are expensive so I suggest getting your dowels locally. Wood is a good material to start with as it’s easier to put a hole through. You may eventually upgrade to metal if you get serious about this but a wooden dowel is an insubstantial cost. 5/8ths of an inch is suggested for armor. Something smaller may look nicer for jewelry but I would discourage going too small on your first piece.
4. Wire
This 18-gauge copper wire might be a good first pick. It will bend easier than 16 gauge but is thicker than 20 gauge to help prevent link slipping. I picked copper because I think it looks great and it bends fairly easy but it isn’t ridiculously expensive like silver or gold.
5. Clasps
You’ll need some kind of clasp to close a necklace or bracelet if that’s what you start with. I picked this option because the multiple metal tones could suit multiple types of projects.
Optional Materials
1. Consider multiple wire colors or metals. Stainless steel and brass are both fun and affordable options for beginners. The multiple colors can actually make the weaving easier as a beginner since they clearly set apart center and outer rings.
One popular cheap option is aluminum. Personally, I avoid aluminum as I know there are health concerns with using it in skin products so I imagine those concerns may translate into jewelry that rests against the skin as well. Thankfully stainless steel is quite cheap to get in bulk.
2. A cordless drill. This can help you punch holes in the dowel as well as spin the dowel to make the rings faster. This will run you more than the rest of the items for the project combined most likely but it’s also just a great household item everyone should have. So if you don’t have one I’d consider grabbing one.
Conclusion
Please comment and tell me about your experience if you give chainmail a try. I really had a lot of fun with this project and a small two-tone project I did after that. I’ll be trying a third piece this weekend with some key changes from my first two attempts so look forward to another post on that.